LEVEL5 Automatic Drywall Taper GEN2!

$1,299.00

Description

OVERVIEW
An automatic drywall taper is used to apply the first coat of joint compound and tape to flat
and angled drywall seams. It significantly increases drywall taping efficiency, as it applies
the first bed of compound and tape in one pass.

The LEVEL5 automatic taper has a high-quality extruded aluminum compound tube that
has been anodized for corrosion resistance and easy cleanup. Internally, the finish ensures
smooth operation while also prolonging the life of the premium composite plunger.
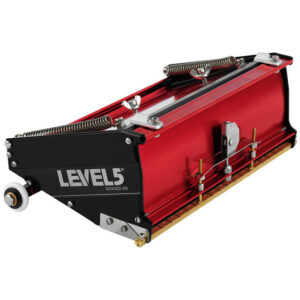
The head of the LEVEL5 automatic taper is precision machined from high-grade aluminum
that is resistant to corrosion and premature breakdown. Side plates, internal plates, cable
drum, drive chain and other components are stainless steel for long term durability. A
quick-clean cover plate utilizes a single thumb screw for easy removal during cleaning.

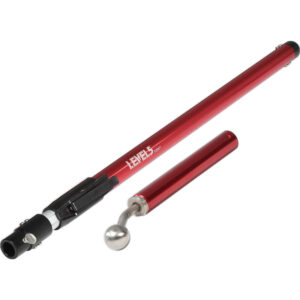
The LEVEL5 automatic taper features an integrated, trigger-controlled creaser wheel to
efficiently set the tape into drywall corners, as well as a quick-change tape holder that makes
exchanging tape rolls fast and easy.
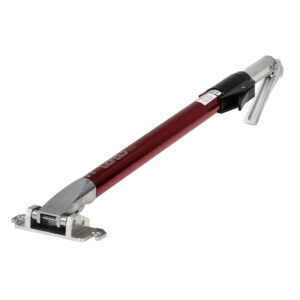
For ultra-smooth operation, the LEVEL5 automatic taper utilizes a rolling chain idling system
that reduces drag, as well as easy-glide wheels embedded into the control sleeve. An
adjustable roller brake and cutting spring tensioner allows the user to customize the feel of

SKU 4-760
UPC 815966023693


Additional information

Weight 9 lbs
Dimensions 56.1 × 6.5 × 7 in
Use Guide

TIPS & TRICKS
We recommend you use general purpose finishing compound or general purpose “lightweight” finishing compound. You can also use “machine mud” which is designed specifically for automatic finishing tools, but it can be more expensive and harder to source. DO NOT use any type of durabond or “hot muds”, as these fast setting compounds could harden inside your automatic taper – requiring you to break your taper down and manually clean every component.
When you first start using the automatic taper, it is suggested you practice using it on scrap drywall or a practice board, so you can get a feel for:
Getting the correct mud consistency. It should be thin enough so that the taper runs smoothly along the seam, but thick enough that the tape remains in place on the wall
Setting the drive wheel brake. The drive wheel brake ensures the drive wheel doesn’t spin backwards when you pull the taper off the wall due to pressure from the cable – as this will create gaps in the mud that is applied behind the tape. You want the brake to be set just enough so that there is not any noticeable resistance and the taper moves smoothly along the seams.
Setting the tape advancing (“gooser”) needle. The automatic taper is set up from the LEVEL5 factory to be used with paper tape. If you are using Fibafuse mesh tape, which is slightly thicker, you will need to back off the advancing needle so that the tape advances correctly when you activate the cutting mechanism.
PRO TIP: Each time to start a new seam run, charge/load the head of the automatic taper with compound by doing a quick 5 to 6” spin of your drive wheel against the wall without advancing the tape; this will ensure that when the tape advances it is fully coated with compound.
On flat seams, always use the automatic taper at a slight angle to the wall or ceiling so that only one side of the drive wheel is touching. If you run the taper flat against the wall, too much of the joint compound will squeeze out from behind the tape.
PRO TIP: During a long flat seam run on a ceiling, rock the taper from one side of the drive wheel to the other side every 2 – 3 feet; this action will ensure the mud and tape stays in place until you’ve had a chance to bed the tape down with a trailing knife.
On inside corner seams, keep your taper as close to 45 degrees as possible, so that both wheels are touching the two walls or the ceiling and the wall. This will make sure tape is centered correctly in the seam as you push it in place with the creaser wheel.
Inside corners generally have more drag than flat seams. When taping these angles, give yourself a few extra inches of lead tape at the start of the run. This extra tape will compensate for any movement in the tape as you move across the seam.
When you get to the end of a seam or a corner, cut the tape 3” to 4” before you finish. Then let the remaining tape roll over the drive wheel and into the corner. With a little practice, you will be able to cut to the perfect length every time.
PRO TIP: If you feel that you have cut the tape a little short, gently pull up on the tape with your hand from partway down the wall. You should be able to center the tape a bit and close the gap.
Always stop the automatic taper completely before activating the control sleeve to cut the tape. Otherwise the tape won’t cut properly at a right angle to the taper and could double cut even jam up your tape.
Before you use your automatic taper, always oil up all moving parts liberally with 3-in-1 machine oil. DO NOT use the original WD-40, as it is caustic and will break down your gaskets and plunger. In fact, we don’t recommend you use any lubrication that is in a spray can, unless you know what the propellant is. Often it is benzyne, which is also very hard on gaskets and seals. We highly recommend common machine oil such as 3-in-ONE
Once you’ve finished cleaning your taper, we suggest liberally coating all moving parts and the inside of the tube with 3-in-ONE oil again. It will displace the water and reduce any opportunity for corrosion.
PRO TIP: You can make short work of cleaning your taper by getting a small electric pressure washer.
When cleaning your automatic taper do not force the plunger towards the head by jamming a rod, stick or anything else from the bottom and pushing against it. This could cause your cable to become caught up at the head and potentially snap it.
PRO TIP: Automatic tapers have several small wearable parts. To minimize any downtime on the jobsite, we recommend you purchase an in-field repair kit (#5-815) that includes most of parts that are often replaced – blades, needles, cable, springs, etc.
USAGE VIDEOS
Episode 01: Mud Consistency for an Automatic Taper
Episode: 02: Setting Up a Compound Pump to Fill an Automatic Taper
Episode 03: How to Use An Automatic Taper
Episode 04: How to Tape Walls and Ceilings with an Automatic Taper
Episode 05: How to Tape Inside Corners with an Automatic Taper
Episode 06: How to Clean and Maintain an Automatic Taper

Warranty

7-YEAR WARRANTY
100% SATISFACTION GUARANTEED
LEVEL5 makes workhorse drywall finishing tools that set the standard for quality & reliability.

We back all of our tools with the strongest warranties in the industry and work hard to provide our family of finishers with the best customer service possible.

Do you have questions about your LEVEL5 Tool(s)? Call our toll-free support line at 866.562.4229 (local: 913.631.0804) or send us an email at support@level5tools.com. Our support team is available Monday through Friday, 7:30am to 4pm Central Time.

MANUFACTURER'S WARRANTY
For its full line of automatic drywall finishing tools and accessories, LEVEL5 Tools, LLC. ("LEVEL5") offers a full seven (7) year warranty to the original owner that these products will be free from defects in material and function. This warranty is valid only in the USA, Canada, Australia, the United Kingdom and Europe. A one (1) year warranty applies in all other countries/markets.

TERMS & CONDITIONS
The Warranty applies to the original owner and is not transferable.
The Warranty is limited to repair or replacement of the product, and does not cover direct, indirect, consequential, incidental or any other type of damage resulting from its use.
The Warranty does not cover normal wear, misuse, negligence, fire, theft, loss or intentional damage.
All shipments to the LEVEL5 facility must be freight paid. LEVEL5 reserves the right to determine whether to repair or replace any product covered under the Warranty. Discontinued products may be replaced with newer models when necessary.